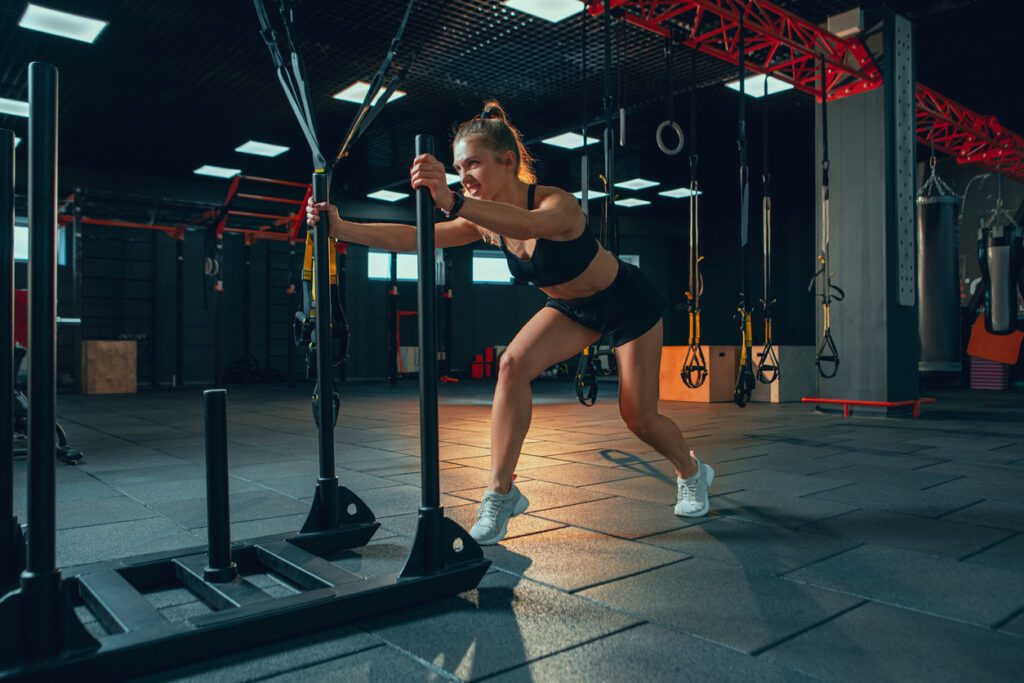
Know the hip thrust
Le Hip Thrust n’est pas seulement un exercice de musculation ; il joue un rôle crucial dans l’amélioration de votre posture et la prévention des blessures. Apprendre à le réaliser correctement est donc essentiel pour en tirer tous les bénéfices, tout en évitant les erreurs courantes qui pourraient compromettre votre progression.
What is Hip Thrust?
The Hip Thrust is an exercise muscle strengthening which mainly targets glutes. Originating in the world of bodybuilding and popularized by fitness trainers and athletes, this exercise has become a must-have for anyone looking to improve their strength and fitness.
This movement involves a extension of hip dynamic, usually performed in a lying position, with the shoulders supported on a bench or stable surface. Its effectiveness in activating the gluteal muscles makes it essential for any muscle strengthening routine, especially for those who aim to improve their sports performance or simply sculpt their figure.
Why the Hip Thrust is essential for your workout
The Hip Thrust is essential not only for develop muscle volume glutes, but also for improve posture overall. By strengthening the gluteus maximus, this exercise helps stabilize hips and reduce the risk of injuries in daily life and sporting activities.
Dans le contexte des sports de puissance, comme le sprint ou le saut, le Hip Thrust contribue de manière significative à la capacité d’explosivité. Les athlètes qui intègrent cet exercice dans leur entraînement observent souvent des améliorations dans leur performance, grâce à une meilleure force de propulsion.
Pour ceux qui ne pratiquent pas nécessairement de sport, le Hip Thrust aide à contrebalancer les effets néfastes d’une vie sédentaire qui peut entraîner une faiblesse des muscles postérieurs de la chaîne, accentuant les risques de mal de dos et de déséquilibres musculaires. Ainsi, intégrer le Hip Thrust à vos routines d’entraînement vous assure de maintenir une base musculaire solide et une posture optimale.
Muscles used during the hip thrust
THE gluteus maximus est la star du Hip Thrust. C’est le plus bulky and the most powerful des muscles fessiers, et son rôle principal est l’extension de la hanche. Lorsque vous exécutez un Hip Thrust, le grand fessier travaille intensément pour soulever les hanches vers le haut, permettant ainsi de sculpt effectively this area of the body.
In addition, the hamstrings jouent également un rôle crucial. Situés à l’arrière des cuisses, ils assistent le grand fessier dans le mouvement d’extension de la hanche. En renforçant les ischio-jambiers, vous pouvez non seulement improve your power but also reduce the risk of injury, as these muscles are often neglected in traditional workouts.
THE lower back, where the lumbar muscles, also acts as a stabilizer pendant l’exécution du Hip Thrust. Bien que leur rôle soit moins direct dans le mouvement d’extension, ils sont essentiels pour maintenir une posture correcte et sécuritaire tout au long de l’exercice.
Muscle functioning during the Hip Thrust
The mechanics of Hip Thrust are based on dynamic extension of the hip, where several muscle groups interact in a synchronized manner. The gluteus maximus, as the prime mover, pushes the hips upward. Meanwhile, the hamstrings provide complementary strength to support this movement.
L’interaction entre ces muscles est cruciale pour une exécution efficace et sans risque. Les ischio-jambiers, travaillant en tandem avec le grand fessier, permettent une powerful climb And controlled, tandis que les muscles du bas du dos assurent que la colonne vertébrale reste alignée et protégée contre d’éventuelles contraintes ou blessures.
By understanding these dynamics, you can not only optimize the performance of your Hip Thrusts, but also avoid common mistakes that could compromise your muscle gains or your safety. Each repetition should be performed with particular care to properly engage these muscle groups, ensuring the best results while preserving your body.
Basic Hip Thrust Technique
Initial positioning for an effective Hip Thrust is crucial. Start by sitting on the floor with your back against a stable bench or platform at knee height. Feet should be placed flat on the floor, hip-width apart. Make sure the bench is sturdy enough to support your weight and movements.
Le placement du dos est également essentiel : les omoplates devraient reposer sur le banc, vous permettant ainsi de créer un pivot stable pour le mouvement de vos hanches. Cette position aide à maximiser l’engagement des fessiers tout en protégeant votre colonne vertébrale.
L’angle optimal des genoux devrait être d’environ 90 degrés lorsque vos hanches sont soulevées. Cela permet une activation maximale des fessiers et des ischio-jambiers tout en minimisant la pression sur les genoux. Assurez-vous que vos pieds restent bien ancrés au sol tout au long de l’exercice pour une stabilité accrue.
Execution of the movement
When climbing, focus on the contraction from your glutes to lift your hips toward the ceiling. Your body should form a straight line from shoulders to knees at the highest position. It is important to breathe correctly: inhale before starting the lift and exhale as you rise. This breathing technique will help you stabilize your core and maximize the force applied.
Le mouvement doit être fluide et contrôlé. Évitez de balancer vos hanches ou d’utiliser l’élan pour monter. La montée doit être strictement due à la force de vos muscles fessiers et ischio-jambiers, garantissant ainsi que vous travaillez les bons groupes musculaires efficacement.
The descent is just as important as the climb. Control the movement by slowly lowering your hips toward the floor. Don't just let your body fall; maintain tension in your glutes and hamstrings throughout the descent. This helps increase time under muscle tension, which is crucial for building strength and mass.
Briefly reset your position on the floor before beginning the next repetition. Make sure your posture remains intact and you're ready to optimally re-engage your muscles for the next climb.
By following these steps and maintaining rigorous technique, you maximize the benefits of Hip Thrust while minimizing the risk of injury. Each repetition must be performed with precision to ensure that you get the most out of this powerful and transformative exercise.
Variations of the Hip Thrust
Hip Thrust with Equipment
The Hip Thrust with rod est une variante populaire qui permet d’increase there resistance and D'intensify l’entraînement. Pour réaliser cette version, placez une barre chargée de poids adaptés à votre niveau de force juste au-dessus de vos hanches. Utilisez un coussin ou une protection spécifique pour la barre afin de prévenir toute douleur ou blessure au niveau du bassin.
When performing the movement, make sure the bar remains stable and the weight is evenly distributed on both sides. The lift should be performed by pushing the feet firmly into the ground, contracting the glutes to elevate the hips. The descent should be controlled, maintaining tension in the targeted muscles.
Les conseils pour l’ajustement des charges sont essentiels : commencez avec un poids léger et augmentez progressivement à mesure que votre force s’améliore. Cela permet d’éviter les blessures et de garantir que la technique reste correcte malgré l’augmentation de la charge.
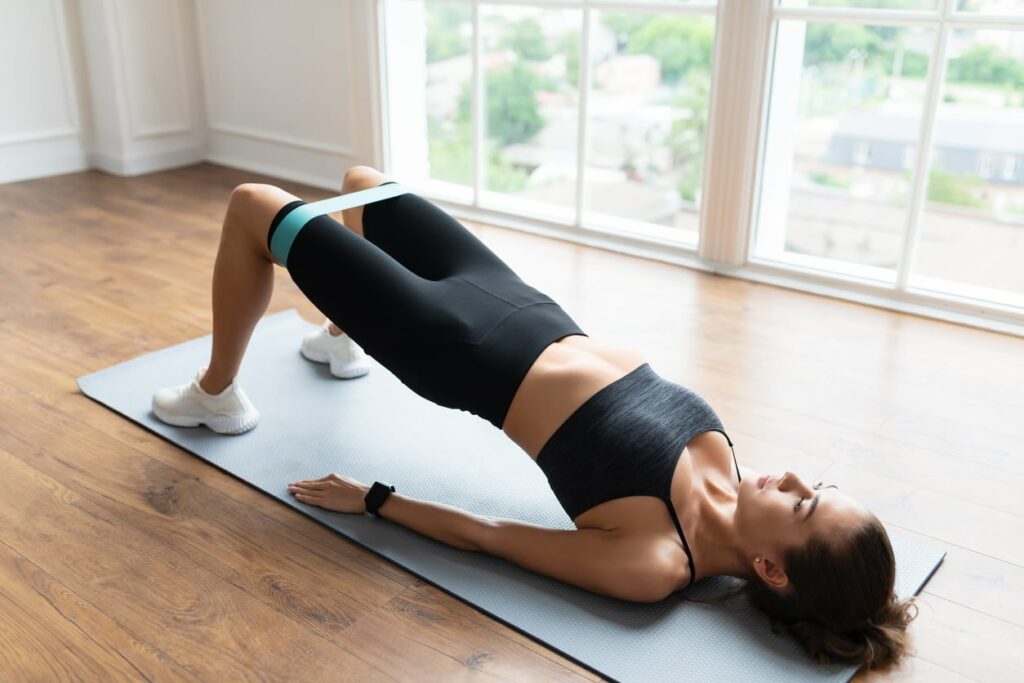
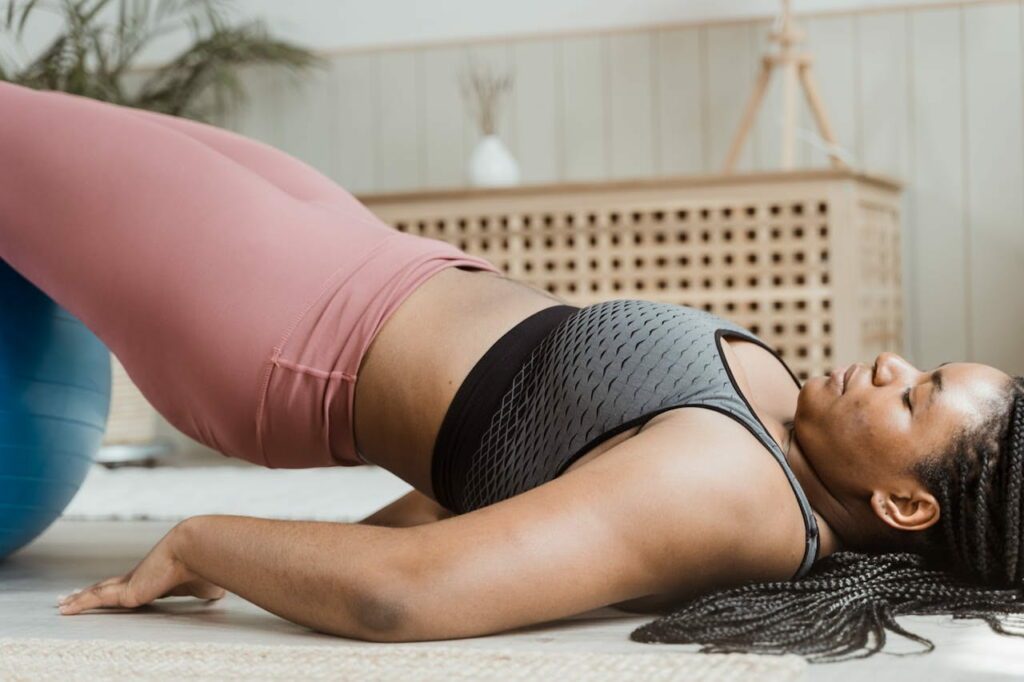
Hip Thrust to the ground
Le Hip Thrust au sol, ou Glute Bridge, est une excellente alternative pour ceux qui n’ont pas accès à un banc ou qui débutent avec cet exercice. Pour cette variante, allongez-vous sur le dos, les pieds à plat sur le sol et les genoux pliés. Vos bras doivent reposer à vos côtés, et vos paumes peuvent toucher le sol pour une stabilité accrue.
The focus here is on the‘élévation des hanches vers le plafond en contractant les fessiers, sans l’aide d’un banc pour appuyer les épaules. Cette version met un peu moins de pression sur le bas du dos, ce qui en fait une option favorable pour ceux qui peuvent ressentir une gêne avec la version standard sur banc.
Les avantages de cette variante incluent sa simplicité et l’accessibilité, car aucun équipement spécialisé n’est nécessaire. Cependant, il est important de noter que les précautions restent nécessaires, notamment en ce qui concerne la technique pour éviter toute tension excessive sur le cou ou le bas du dos.
En explorant ces variantes du Hip Thrust, vous pouvez non seulement ajouter de la diversité à votre routine d’entraînement, mais également adapter l’exercice à vos besoins spécifiques et à votre environnement d’entraînement. Chacune de ces options offre des avantages uniques et permet de cibler les muscles des fessiers et de la hanche de manière légèrement différente, contribuant ainsi à un développement musculaire complet et équilibré.
Progress and starting weight
Pour les débutants, il est crucial de commencer le Hip Thrust avec un poids qui permet de maintenir une bonne technique tout au long de l’exercice. Initialement, vous pourriez même envisager de pratiquer le mouvement sans poids afin de vous familiariser avec la bonne forme. Une fois que la technique de base est maîtrisée, vous pouvez introduire progressivement des poids légers.
L’utilisation d’une barre légère ou même de poids du corps au début vous aide à vous concentrer sur l’activation correcte des muscles fessiers sans risquer de surcharger le dos ou d’autres muscles qui ne sont pas l’objectif principal de cet exercice. La choix du poids initial doit être tel que vous pouvez effectuer environ 10 à 15 répétitions sans compromettre la forme.
Progress
Une fois que l’exécution du Hip Thrust avec un poids initial devient confortable et que vous pouvez compléter les séries sans fatiguer prématurément, il est temps d’augmenter progressivement la charge. Augmenter le poids de manière graduelle est essentiel pour continuer à stimuler les muscles et favoriser la croissance et la force musculaires.
La progression peut aussi inclure l’augmentation du nombre de répétitions par série ou l’ajout de variantes plus difficiles, comme le Hip Thrust unilatéral (un pied à la fois) pour un challenge supplémentaire. Il est recommandé d’augmenter le poids de 5% à 10% dès que vous pouvez réaliser deux séries complètes à l’intensité actuelle sans réduire la qualité de la forme.
Recommended frequency and number of repetitions
To obtain good results, practice the Hip Thrust 2 to 3 times a week. This allows adequate rest time between sessions, essential for muscle recovery and injury prevention. As for the number of repetitions, a good starting point is to perform 3 to 4 sets of 10 to 15 repetitions.
La clé est d’écouter votre corps : si vous ressentez une douleur autre que la fatigue musculaire habituelle, réévaluez votre technique et le poids utilisé. Le respect de ces lignes directrices vous aidera à maximiser l’efficacité de l’exercice tout en minimisant le risque de blessure.
Common Mistakes and How to Avoid Them
Les erreurs les plus courantes lors de la pratique du Hip Thrust incluent le levage excessif de la charge, compromettant la forme, et le manque de contrôle pendant la phase de descente. Pour les éviter, assurez-vous toujours que le mouvement est guidé par la force des fessiers et non par l’élan. De plus, évitez de surélever les hanches au-delà de l’alignement naturel du corps pour ne pas mettre de tension sur le bas du dos.
En tenant compte de ces directives, vous pouvez établir une fondation solide pour l’intégration du Hip Thrust dans votre routine d’entraînement, garantissant une progression sûre et efficace.
Practical tips for optimizing Hip Thrust
Pour maximiser l’efficacité du Hip Thrust et garantir les meilleurs gains possibles, voici quelques astuces clés à intégrer dans votre pratique :
Isometric contraction: À la hauteur de la montée, maintenez une contraction des fessiers pendant 1 à 2 secondes avant de redescendre. Cette pause isométrique augmente l’intensité de l’exercice et renforce davantage les muscles ciblés.
Engagement of the abdominal core: Activez votre tronc tout au long de l’exercice pour stabiliser le bas du dos et augmenter la transmission de force à travers les hanches. Cela aide également à protéger votre colonne vertébrale.
Proper breathing: Respirez profondément avant de soulever et expirez en poussant les hanches vers le haut. Une bonne respiration aide à stabiliser le tronc mais aussi à maximiser la puissance pendant l’effort.
Feet well positioned: Gardez vos pieds à plat sur le sol, écartés à la largeur des épaules, et pointés légèrement vers l’extérieur. Cette position favorise une meilleure activation des fessiers et une plus grande stabilité.
Specific warm-up: Before you begin your Hip Thrust set, perform a focused warm-up that includes hip mobility moves and light exercises to activate the glutes, like glute bridges or quadruped hip extensions.
Integration into your training routine
Pour bénéficier pleinement des avantages du Hip Thrust, il est important de l’intégrer judicieusement dans votre routine d’entraînement :
Combinaison avec d’autres exercices : Intégrez le Hip Thrust dans un circuit qui cible également d’autres groupes musculaires pour un entraînement équilibré. Par exemple, associez-le avec des squats, des deadlifts et des exercices de presse pour travailler la partie inférieure du corps de manière complète.
Planification d’une séance type : Start your workout with exercises that require greater neuromuscular activation, such as squats or deadlifts, and finish with the Hip Thrust to specifically target the glutes when they are already pre-activated.
Fréquence et volume d’entraînement : Pour progresser, le Hip Thrust doit être pratiqué régulièrement. Intégrez-le 2 à 3 fois par semaine, en ajustant le volume et l’intensité en fonction de votre niveau de fatigue et de votre récupération globale.
Tracking progress: Notez le poids utilisé, le nombre de répétitions et de séries, ainsi que vos sensations durant l’exercice pour ajuster progressivement votre entraînement et continuer à progresser.
By following these practical tips, you can not only improve the performance of your Hip Thrust but also maximize the benefits for your physical development and general well-being.
Conclusion
Le Hip Thrust est un exercice fondamental pour renforcer efficacement les fessiers et améliorer la posture. Sa technique correcte, incluant le positionnement du dos et des pieds, maximise l’activation musculaire tout en minimisant les risques de blessure. Grâce aux différentes variantes présentées, vous pouvez adapter l’exercice à votre niveau et à votre environnement, en utilisant des équipements ou en optant pour des méthodes plus simples au sol.
To progress, adjust the weight and frequency of training according to your abilities, avoiding common errors for safe practice. Tips like isometric contraction and proper breathing are key to increased efficiency.
Build muscle at DRIP
Repoussez vos limites et concentrez-vous sur l’amélioration de votre force musculaire avec nos séances de HIIT ou de HYROX training has DRIP ! Join us for sessions of 50 minutes pleines d’intensité.
Chez DRIP, plongez dans un environnement dynamique dès l’entrée, avec seven workshops divided into three series pour transformer chaque moment en un défi captivant. Nos coachs énergiques vous guideront au rythme de playlists mémorables. Accessible à tous les niveaux, DRIP offre l’environnement idéal pour sculpter vos jambes efficacement. Vous allez adorer nous détester ! ❤️🔥